InstantIoT Server is the open-source server you can run at home — on a Raspberry Pi, a PC, a Mac — so that your devices and the app talk through your machine and your data never leaves it. It is not InstantIoT Cloud: it is a separate program, free, under the AGPL licence, in beta, made for personal projects — a closed network, a school lab, a workshop. This page installs it, points a device at it, and connects the app.
Personal projects, not production. InstantIoT Server stores everything in a single SQLite file and is sized to run on a Raspberry Pi: fine for one household, one classroom, one bench. If you need a private server with real constraints — many users, many devices, uptime, advanced authentication, administration, backups you can audit — that is what InstantIoT Cloud is built for, and it can be deployed privately for you. Contact us.
What it is
A relay between your devices (TCP, port 9001) and the app (WebSocket, port 8080), with the same signal model as the Cloud — a device writes a value at an address I0…I255, the app decides what it looks like — a time-series history in three tiers (minute, hour, day), several user accounts, a web admin panel, automatic backups, and mDNS discovery so the app finds it on the LAN by itself. Stack: Kotlin, Ktor, SQLite. Source and releases: github.com/jeanloickdt/instantiot-server.
What it does not have, compared with the Cloud: access from outside your network unless you set it up yourself, the security and administration built for many accounts, and the plans — everything is unlimited, on your own disk, at your own risk.
Install it
Native installer — from the Releases page: .deb for Linux and Raspberry Pi (arm64), .dmg for macOS, .msi for Windows. On a Mac or a PC it is a tray app — install, launch, a tray icon appears. On a Raspberry Pi it is a service:
sudo dpkg -i instantiot-server_*_arm64.deb     # installs and enables the instantiot-server service
systemctl status instantiot-server
curl http://localhost:8080/health              # → {"status":"ok","uptimeMs":...}
From source — with JDK 21:
git clone https://github.com/jeanloickdt/instantiot-server.git
cd instantiot-server
./gradlew run                                  # or: ./gradlew buildFatJar && java -jar build/libs/instantiot-server-all.jar
On startup the server prints its ports and creates the first admin account:
Starting InstantIoT Server v1.x.x
HTTP port: 8080 | TCP port: 9001
Open http://localhost:8080, sign in as admin / admin, and change that password at once (admin panel → settings). Everything the server owns is under ~/.instantiot/ — the database, the backups, and server.properties, the configuration, most of which is also in the admin panel:
http.port=8080                     # the app and the panel — restart required
tcp.port=9001                      # the devices — restart required
server.displayName=Workshop        # the name the app shows in Discovery
registration.open=false            # true: anyone on the LAN may create an account
history.retention.min.days=90      # minute summaries kept 90 days
history.retention.hour.days=365    # hour summaries, a year
history.retention.day.days=-1      # day summaries, forever
backup.interval.hours=24           # a consistent snapshot in ~/.instantiot/backups/, every day
backup.retention.count=30          # the newest thirty
Forgot the admin password? On the machine, touch ~/.instantiot/reset-admin and restart: the password is back to admin — owning the machine is the proof.
Connect the app
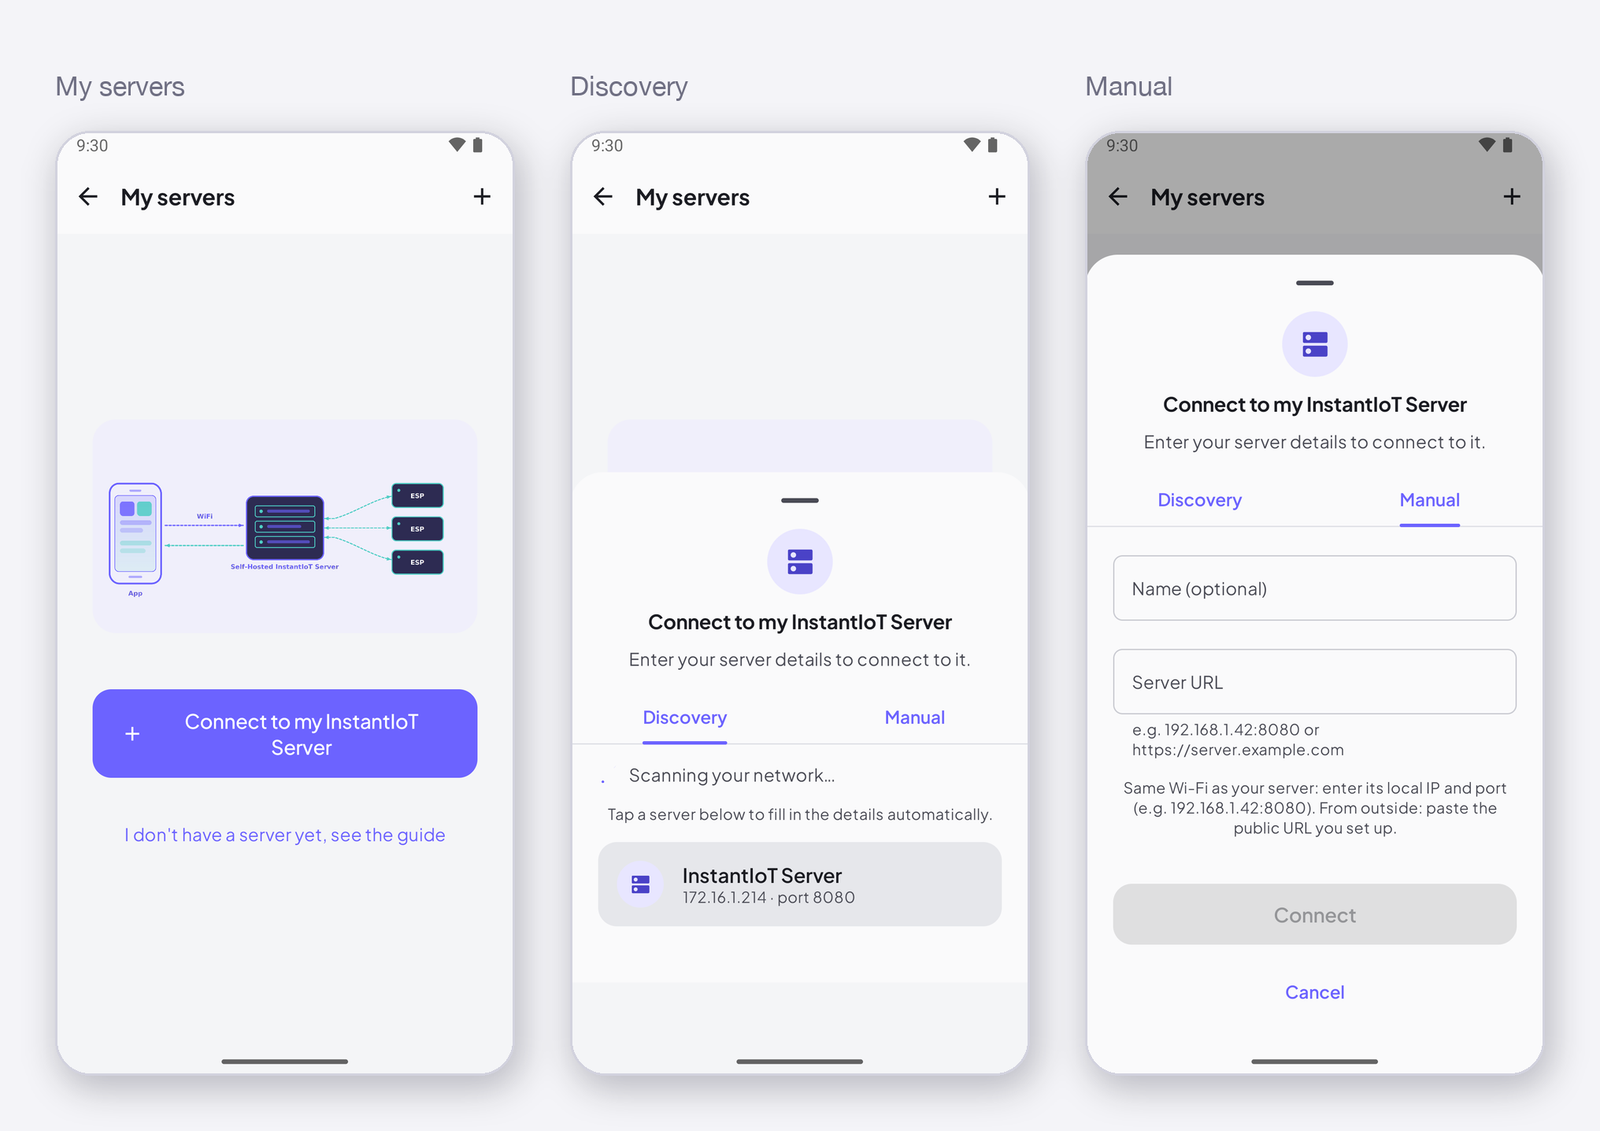
On the phone, open My profile → This device → My servers → Connect to my InstantIoT Server. On the same Wi-Fi, Discovery finds the server by itself — tap it. Otherwise Manual: a name, and the server’s address — 192.168.1.42:8080, or the public URL you set up. Sign in with an account of that server. Then create projects on it exactly as on the Cloud: register devices, declare signals, build dashboards.
Not found by Discovery? mDNS does not cross some routers and VLANs. Manual, with the address the server prints — on a Pi, hostname -I gives it:
Name      Workshop
Address   192.168.1.42:8080
Point a device at it
In the sketch, the connection line names your server instead of the Cloud:
#include <InstantIoT.h>

const char* WIFI_SSID    = "MyWiFi";
const char* WIFI_PASS    = "secret";
const char* SERVER_HOST  = "192.168.1.42";                 // the server's IP — the TCP port, 9001, is the default
const char* DEVICE_TOKEN = "the-token-your-server-gave-you";
InstantTimer timers;

ISimpleButton(I0) {
    WHEN_PRESSED  { digitalWrite(LED_BUILTIN, HIGH); }
    WHEN_RELEASED { digitalWrite(LED_BUILTIN, LOW);  }
};

void publish() { InstantIoT.write(I1, analogRead(A0) * 3.3 / 4095.0); }

void setup() {
    pinMode(LED_BUILTIN, OUTPUT);
    InstantIoT.begin(WiFiLink(WIFI_SSID, WIFI_PASS), MyServer(SERVER_HOST, DEVICE_TOKEN));
    // InstantIoT.begin(WiFiLink(WIFI_SSID, WIFI_PASS), MyServer(SERVER_HOST, 9005, DEVICE_TOKEN));   // if you changed tcp.port
    timers.every(2000, publish);
}

void loop() { InstantIoT.loop(); timers.run(); }
The token comes from your server — register the device in the app, connected to your server, exactly as with the Cloud; it is shown once. Without a domain and a certificate the link is plaintext, which is fine on a LAN: your data never leaves it. Behind a TLS front with a domain, MyServer("iot.example.org", 443, DEVICE_TOKEN).secure(). Every connection line: Connect your device.
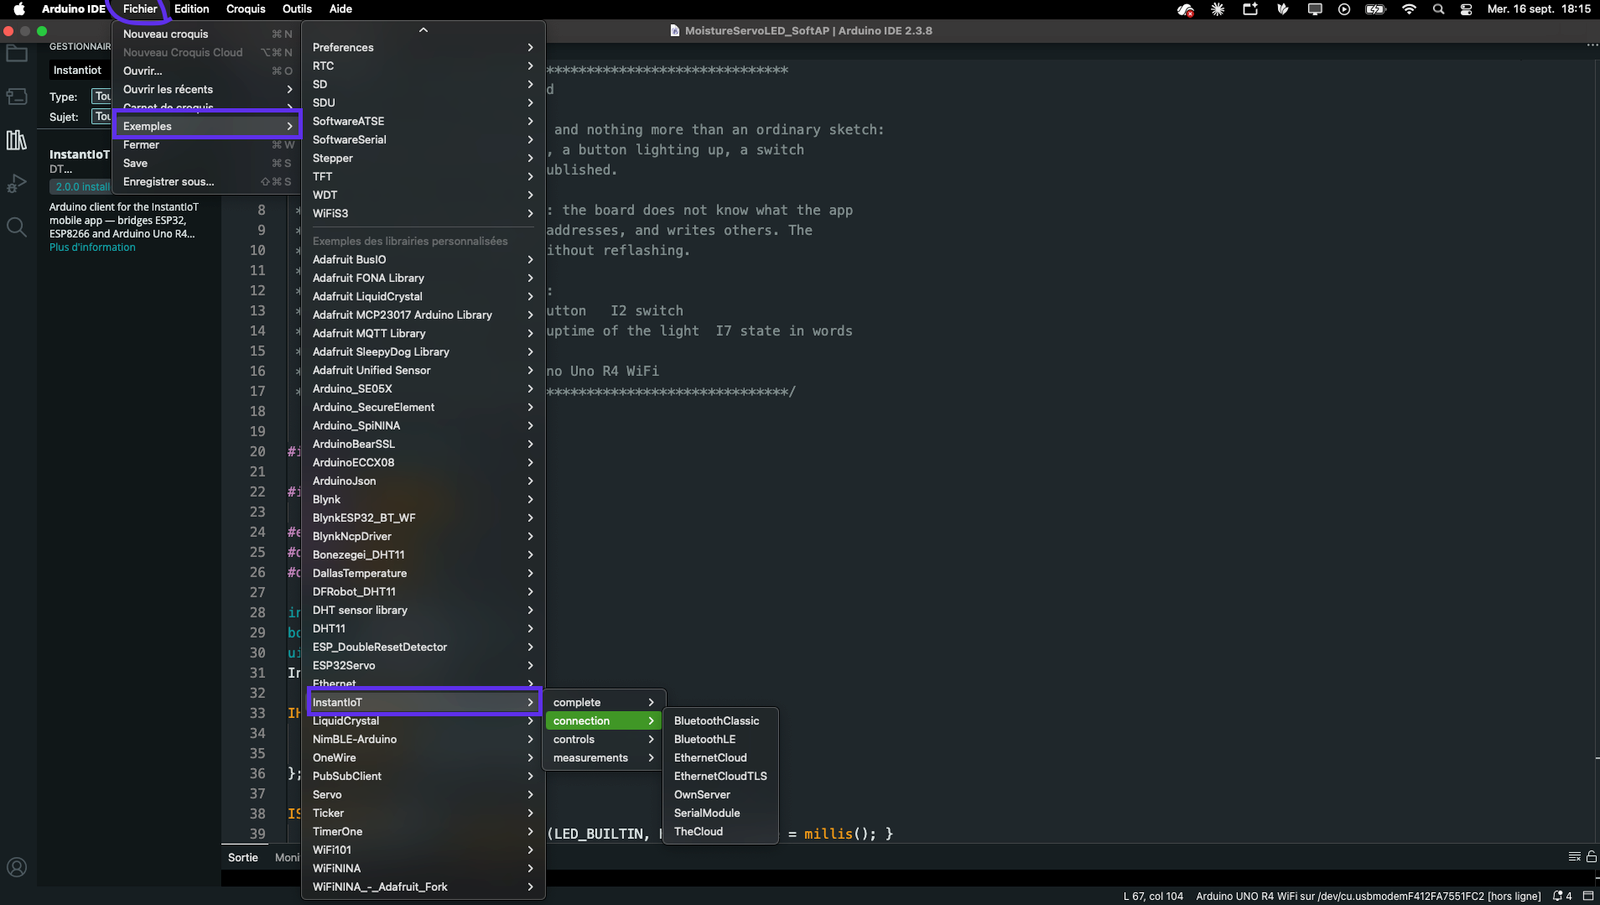
File → Examples → InstantIoT → connection → OwnServer is this sketch; complete → Diagnostic says on the Serial monitor, once a second, whether the device has joined the Wi-Fi, the server, or neither.
When it does not work
| Symptom | Cause, and what to do |
|---|---|
The panel does not open on :8080 |
the port was taken and the server moved to 8081…8085 — the startup log says which; or free 8080 and restart |
| The app does not find the server | mDNS blocked: add it by hand, IP:8080; the server logs mDNS published when it worked |
| The device does not connect | it needs the TCP port (9001), not 8080 — check the IP, that 9001 is not firewalled, and the token; a connection accepted then dropped within seconds is a wrong token |
| A value never shows up | same rule as the Cloud: the address is declared on that device, with a type the value fits |
| The disk fills up | lower the retention values, or the number of backups kept |
curl http://192.168.1.42:8080/health          # is it up?
curl http://192.168.1.42:8080/api/version     # which version?
journalctl -u instantiot-server -e            # Raspberry Pi: the log
Where the rest is
Operating guide, backups and restore, the admin panel, the configuration keys: in the repository — github.com/jeanloickdt/instantiot-server.